In our previous lesson, we explored how numbers are shown on the abacus. We discovered that each upper bead equals “5”, and each lower bead represents “1”. By counting the beads moved towards the bar and considering their place values, we figured out how to read numbers on the abacus.
In this lesson, we’ll learn how to place beads on the abacus. There are different methods to choose from, like deciding which finger to use or which bead to move first. While some may not think about finger placement at first, the method we’ll focus on is commonly used in Japan. Japanese elementary school children use this technique in their abacus lessons too.
Although it might seem a little confusing at first, with practice, you’ll quickly remember the steps and move the beads easily, making calculations faster.
Which fingers are used for manipulating the beads?
Using the Thumb
Lesson Video [Using the Thumb]
In this tutorial video, you’ll get easy, step-by-step lesson on using your thumb to move the beads. This lesson focuses on thumb techniques rather than adding numbers on the abacus (Don’t worry, we’ll cover that in our next lesson!).
We use the thumb to add lower beads like 1, 2, 3, and 4. You can move multiple beads at once when using your thumb. For example, if you want to add 3, simply slide 3 lower beads together – no need to move them one by one!
We will also explore adding lower beads using the thumb across various place columns, covering numbers like tens, hundreds, and even thousands.
The method remains consistent across all columns. Just ensure you’re in the correct place value column for the number you’re adding.
For instance, to add 400 on the abacus, find the hundreds column, second to the left of the ones place. Remember, always start with the bead representing the larger value when adding on the abacus.
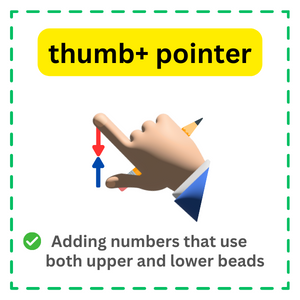
Using the Thumb and Pointer
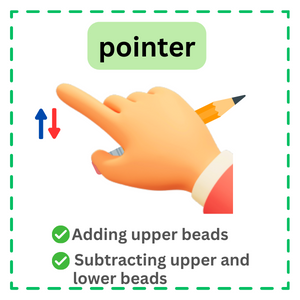
Using the Pointer
Lesson Video [ thumb+pointer Pointer]
The pointer is great for adding and subtracting the upper beads and subtracting the lower beads (except when using the pointer and thumb for subtracting numbers like 6, 7, 8, 9).
Just like with addition, you can subtract multiple beads at once if the number is more than 1.
For instance, if you want to subtract 4, you can move 4 lower beads at once.
When it comes to adding numbers that involve both upper and lower beads, like 6, 7, 8, and 9, the pointer and thumb work together! This technique makes manipulating the abacus faster and easier.
The pointer is very important because it deals with both the upper and lower beads.
And remember, the order of operations matters too! For instance, when subtracting a number like 7—which involves both upper and lower beads—use your pointer to subtract the lower beads first, then the upper bead (unless you subtract the beads simultaneously).
But with practice and a good grasp of the rules, moving the beads will become faster and feel like second nature in no time.
Practice Questions
Keep practicing all the worksheet or video problems repeatedly until you feel confident about using the thumb, pointer, and thumb+pointer rules. Regular practice is key to mastering the finger techniques swiftly. While there are various ways to move the beads or develop your own approach, adhering to certain rules can streamline the process, making it quicker and simpler.
Click below for the printable worksheets and watch the practice video below.
Let’s go over the finger rules in both addition (Part 1 and 2) and subtraction. Make sure to check out all the practice videos so you can become skilled and confident in using your fingers on the abacus.
“In this lesson, we’ve demonstrated how to manipulate abacus beads using your fingers. Mastering the correct finger movements and understanding the order of operations is crucial. Ensure you’re comfortable with these concepts before progressing to the next lessons, where we’ll dive into actual additions and subtractions.